.png)
Small Refrigerator – Freezer
USE OF APPLIANCE
-
Do not store explosive substances such as aerosol cans with a flammable propellant in this appliance.
-
In case of power supply failure, do not open the freezer compartment unless the freezer has not operated for over 16 hours.
-
The Lower part: is the refrigerator compartment intended for storing fresh food at temperatures above 0oC.
-
The Upper part is the freezer compartment intended for freezing fresh food & long-term storage of frozen food (up to 1 year, depending on the type of food).
TO CHANGE THE SHELF POSITION:
-
Lift the clearance in the guides, set the shelf height to your liking.
-
When the shelf is at the desired height, push it back to the end of the guides.
TO REMOVE THE SHELF FROM THE APPLIANCE:
-
Lift the shelf with your hand and pull it towards you as far as the clearance in the guides.
-
When it reaches the clearance in the guide, lift the left-hand side of the shelf upwards and pull the shelf from the appliance at an angle.
-
To replace the shelf, observe the reverse order.
ADJUSTABLE DOOR BIN:
-
Squeeze the tans on both sides and move the bin/ shelf up or down.
SAFETY INSTRUCTION
-
Do not locate multiple portable socket outlets or portable power supplies at the rear of the appliance.
-
Unplug the power cord from the wall outlet before cleaning.
-
Call our service technician if the supply cord is damaged.
-
Call our service technician if LED lighting doesn’t work - (DO NOT attempt to repair it yourself).
-
Do not use any electric devices inside the appliance.
-
Do not use mechanical devices or other means to accelerate the defrosting process.
-
The appliance is not intended for use by persons (including children) with reduced physical, sensory or mental capabilities or lack of experience and knowledge unless they have supervision.
Oven
This appliance meets the Eco design requirements.

CONTROL PANEL
1. SELECTION KNOB
Switch the oven on by selecting a function.
Turn to the 0 position to switch the oven off.
2. LIGHT
With the oven switched on, press to turn the oven compartment lamp on or off.
3. SETTING THE TIME
For accessing the cooking time settings, delayed start and timer. For displaying the time when the oven is off.
4. DISPLAY
5. ADJUSTMENT BUTTONS
For changing the cooking time settings.
6. THERMOSTAT KNOB
Turn to select the temperature you require when activating manual functions. Automatic functions use 0/A.
DESCRIPTION OF DISPLAY
1. Pre-heating symbol
2. Clock; information and function duration
3. Kitchen timer
4. End of cooking time
5. Duration
6. Clock
SAFETY INSTRUCTION
-
Fire Blankets are placed in the kitchen drawer.
-
Children and people with less physical, sensory, or mental capabilities or lack of experience should only use the appliance with supervision.
-
Never leave appliances unattended during food drying.
-
Keep cloths or other flammable materials away from the appliance until the components have cooled down completely.
-
Use oven gloves to remove pans.
-
Do not use multiple sockets or adapters.
-
Call our service technician when sensing trouble immediately.


Dishwasher
Starting the dishwasher
1. Turn the water tap on.
2. Open the door and press the ON/OFF button.
3. Measure out the detergent. (See adjacent information).
4. Load the racks (see loading the racks).
5. Select the wash cycle in accordance with the type of crockery and its soil level (see Table of wash cycles) by pressing the P button.
6. Select the wash options*. (See Special wash cycles and Options).
7. Start the wash cycle by shutting the door.
8. The end of the wash cycle is indicated by beeps and by the flashing of the indicator light of the selected wash cycle. Open the door, switch off the appliance by pressing the ON/OFF button, shut off the water tap and unplug the appliance from the electricity socket.
9. Wait a few minutes before removing the crockery in order to avoid burns. Unload the racks, beginning with the lower level.

(3*) Introduce the detergent into the dry dispenser “B” only. Place the amount of detergent for pre-washing directly inside the tub.

(4*) Loading the racks
- The lower rack can hold pans, lids, dishes, salad bowls, cutlery, etc. (Larget plates and lids should ideally be placed at the sides.
- Upper rack delicate and lightweight crockery such as glasses, cups, saucers and shallow salad bowls.
(5*) Wash Cycle

GENERAL SAFETY
-
Children younger than 8 years old & people with reduced physical, sensory or mental capabilities are prohibited from operating the machine.
-
Do not touch the appliance when barefoot
Microwave
Control Panel
1. Microwave
2. Grill
3. Combi Grill (Grill with microwave)
4. Food Defrost
5. Auto Clean
6. Pre-set cooking programmes
7. Rising / Mute On/Off by 3 seconds
8. Keep Warm / Clock setting by 3 seconds
9. Soften & Melt / Kitchen timer by 3 seconds
10. Rotator Knob
11. Stop
12. Start/Jet start

1. Pre-set cooking programmes Icon
2. Food Defrost Icon
3. Special functions Icon
4. Auto clean Icon
5. Microwave power (watt) Icon
6. Microwave Icon
7. Grill Icon
8. Clock/Insert time Icon
9. Mute Off Icon
10. Weight (grams) Icon

TO COOK WITH MICROWAVE POWER INDIVIDUALLY:

Apartment Fridge & Freezer

1. Temperature Display
2. Freezer temperature - Fast freeze
3. Turning off the sound alarm - Child Lock
The “Child Lock” can be activated/deactivated by keeping the button pressed for 3 seconds, until a confirmation sound is heard (the icon lights up).
If you press any button while the “Child Lock” is active, you will hear a sound and the “Child Lock” icon will flash.
4. On/standby
Press the button for 3 seconds to turn the appliance off. In Stand-by mode, two dashes light up on the display and the light in the refrigerator compartment does not turn on.
5. Refrigerator temperature
6. EcoNight

Hot Plate
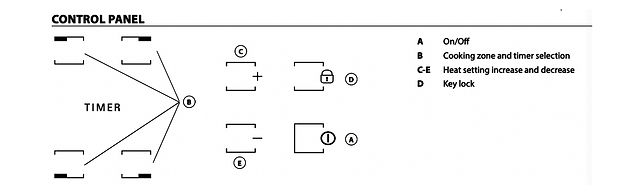
USAGE
SWITCHING THE HOB ON/OFF
To switch the hob on, keep button “A” pressed for approx. 2 seconds. The 4 cooking zone displays show “0”. If, within 20 seconds, none of the cooking zones is activated, the hob switches off automatically as a safety precaution.
SWITCHING ON AND ADJUSTING COOKING ZONES
Press one of the buttons, “B” corresponding to the cooking zone you intend to use. Select the heat setting required with buttons “E” or “C”. The other selectable cooking settings go from 1 to 9. Press buttons +/− at the same time to cancel all settings.
Pressing the button “+” when level 9 is reached, the “Booster” function is activated, and the letter “A” appears on the display.
IMPORTANT: the control is deactivated 10 seconds after the heat setting has been selected.
To change the heat setting, first press the selection button “B” again, then proceed to change the setting using buttons “E” or “C”.
TIMER
To set the Timer function, select the desired cooking zone and power setting then press the cooking zone key again and a luminous dot will appear on the display of the timer-controlled cooking zone. The indication “00” blinks on the 2 displays. Press buttons “C” or “E” to set the time from 1 to 99.
IMPORTANT: after 10 seconds the timer displays will show the power setting of the other cooking zones.
To view the remaining cooking time, press the timer-controlled cooking zone key twice.
KEY LOCK
The Key lock function is switched on by holding down button “D” until a dot lights up above the function button. The Key lock function locks all the hob’s other functions, with the exception of the On/Off button “A”. The function remains on even after the hob is switched off and on again and can be deactivated by pressing button “D” again until the dot above the function button goes off.
RESIDUAL HEAT INDICATOR
When the cooking zone is switched off, the residual heat indicator “H” remains on or flashes alternating with “0” until the temperature of the hob returns within safety levels.
IMPORTANT: The hob’s safety features include an automatic switching-off function. Prolonged use of the same heat setting triggers automatic switch-off of the cooking zone (for example, after around 1 hour at maximum heat setting, the cooking zone switches off).
IMPORTANT: To avoid permanent damage to the hob:
-
Do not use pots with bottoms that are not flat.
-
Do not use metal pots with enameled bottoms.
-
Do not place hot pots/pans over the control panel.
Safety instruction:
-
The appliance and its accessible parts become hot during use. (Avoid touching heating elements)
-
If the hob surface is cracked, do not use the appliance to avoid electric shock.
-
Do not store items on the cooking surfaces.
-
Unattended cooking on a hob with fat or oil can be dangerous.
-
In case of fire, do not extinguish a fire with water; instead, switch off the appliance and then cover the flame with a lid or blanket. (blanket placed in drawer)
-
Keep cloths or other flammable materials away from the appliance until all the components have cooled down completely.